If your hips feel “tight,” stretching is often the first thing people recommend. Stretching can feel good and may temporarily increase range of motion, but flexibility alone does not give you strength or control in that range.
That is why I like using the 90-90 position as more than a stretch. It can become an active hip-strength and mobility drill that helps you work on rotation, control and confidence through a range of motion.
What Is the 90-90 Position?
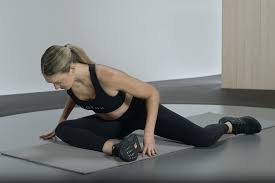
In the 90-90 position, both hips are placed into rotation at the same time. The front hip is primarily in external rotation, while the back hip is primarily in internal rotation.
You do not need to force both knees perfectly to the floor or create exact 90-degree angles. Use a position that feels manageable and adjust your stance as needed.
Mobility Is More Than Flexibility
Flexibility describes how much range is available. Mobility includes your ability to actively move into and control that range.
For example, you may be able to push your leg into a position with your hands but have difficulty lifting or holding it there without assistance. Strengthening through range can help make mobility more usable.
The hips move in several directions, including flexion, extension, abduction, adduction and rotation. Internal and external rotation show up in walking, turning, squatting, changing direction and many sports.
The goal is not to maximize rotation. It is to have enough comfortable range and control for the activities you want to do.
1. Lying Hip Rotations
If seated 90-90 feels too demanding, start on your back.
Place your feet wider than hip width with the knees bent and slowly allow the knees to move side to side like windshield wipers. Keep the range comfortable and let the hips explore rotation without forcing the movement.
Try 5–10 controlled repetitions.
2. Supported Seated 90-90
Sit in a 90-90 position with your hands behind you for support.
Allow your weight to shift between the hips while keeping the movement comfortable. The hands reduce the amount of strength and mobility required and make this a good progression before sitting unsupported.
3. Seated 90-90 Without the Hands
When the supported version feels comfortable, try taking the hands away.
You may immediately notice more work through the hips and trunk. Sit as tall as you comfortably can, but do not force an upright posture if your current hip range makes that difficult.
4. Back-Foot Lift
From the 90-90 position, keep the back knee on the floor and try lifting the back foot.
This challenges active internal rotation at the hip.
The foot may barely move at first.
That is fine.
Focus on creating the movement from the hip rather than twisting through the rest of the body.
5. Front-Knee Lift
Keep the front foot grounded and try gently lifting the front knee.
This challenges active external rotation.
Use a small range and avoid leaning dramatically to create movement.
Try 5–10 controlled repetitions.
6. Back-Leg Lift
Once you have more control, try lifting the entire back leg slightly away from the floor.
This is much harder than it looks.
The goal is not height.
A small controlled lift can provide plenty of challenge.
7. 90-90 Transitions
Move from one 90-90 position to the other by rotating both knees across the body.
You can keep your hands behind you at first, then gradually use less assistance.
This is one of my favourite ways to combine hip rotation with coordination.
8. 90-90 Hip Hinge
From the 90-90 position, gently hinge forward over the front leg.
Instead of collapsing downward, think about lengthening through the torso while moving from the hip.
You can use this as a mobility drill or add a light load once the movement feels controlled.
9. Transitioning Up From the Floor
The 90-90 position can also become part of floor-to-standing practice.
Use your hands at first if needed.
Gradually work toward using less support as your strength, balance and mobility improve.
Being comfortable getting up and down from the floor is a useful physical skill at any age.
Is Passive Stretching Bad?
No.
Passive stretching can be useful, enjoyable and appropriate.
The problem is only when stretching becomes the entire plan.
A complete mobility routine may include:
passive stretching
active mobility
strength through range
balance
coordination
regular movement
You do not have to choose between stretching and strengthening.
Strength Through Range
One reason I like 90-90 work is that it lets you strengthen hip rotation in positions where people often only stretch.
That may include:
holding a position actively
lifting the foot or knee
transitioning between sides
hinging
getting up from the floor
This can help build confidence in ranges that initially feel unfamiliar.
What If 90-90 Feels Uncomfortable?
The position is not appropriate for everyone in the same form.
Try:
sitting on a cushion or yoga block
opening the knee angles
leaning back onto the hands
using the lying-down version
reducing the range
If you experience sharp hip or knee pain, stop and choose another exercise.
Does 90-90 Prevent Injury?
I would not use it that way.
Strong, mobile hips may support many physical activities, but no single exercise prevents injury.
Injury risk depends on training load, previous injury, sport demands, recovery and many other factors.
Think of 90-90 work as one way to build hip capacity, not as protection against every future problem.
90-90 and Knee or Back Pain
Hip mobility and strength can influence how you move, but hip exercises do not automatically fix knee or back pain.
Pain is more complex than one tight muscle or one limited joint.
If pain is persistent or worsening, an appropriate healthcare or rehabilitation professional can help determine what is contributing.
How I Program 90-90 Work
For many people, I use 2–3 variations at a time.
A simple session might include:
5–10 hip rotations per side
5–8 foot or knee lifts
5–8 90-90 transitions
a short supported hold
You do not need to exhaust the hips.
Slow, controlled repetitions are usually more useful than forcing range.
Strength and Mobility Belong Together
The goal is not simply to become more flexible.
It is to have enough range of motion and enough strength to use it.
An agility ladder is a simple tool, but it can add a lot of variety to a workout. It can be used for footwork, coordination, rhythm, balance and short bouts of conditioning.
It is not only for athletes, and it does not need to be fast or complicated to be useful. The biggest benefit is often learning to move with more control in different directions.
What Is an Agility Ladder?
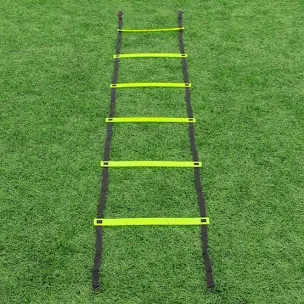
An agility ladder is a flat ladder placed on the floor or ground.
It can be used for stepping patterns that challenge:
coordination
foot placement
rhythm
balance
change of direction
reaction
cardiovascular fitness
The ladder itself does not create agility. It simply gives you a structure for practicing movement patterns.
Why Agility Ladder Training Can Be Useful
Traditional strength training is excellent for building force and muscle.
Agility ladder work adds a different challenge.
You have to pay attention to where your feet are going, control your body position and sometimes change direction quickly.
That makes it a useful complement to strength training, not a replacement for it.
Coordination and Motor Learning
Agility ladder drills require your brain and body to coordinate movement in a specific pattern.
You may need to:
step forward and backward
move laterally
cross one foot over the other
change rhythm
react to a cue
coordinate the arms and legs
Practicing these patterns can improve skill and coordination.
I would avoid calling this “neuroplastic training” as if the ladder has a special effect on the brain. Learning any new movement skill involves the nervous system adapting.
Foot and Ankle Control
Ladder drills can challenge the feet and ankles because the body has to make frequent small adjustments.
That can be useful for developing:
foot control
ankle stability
balance
confidence with quick steps
But I would not claim that agility ladders prevent ankle or knee injuries.
They can be one part of a broader program that also includes strength, balance and progressive loading.
Knee and Hip Control
Side-to-side and diagonal patterns can also challenge the hips and knees.
The goal is not to force the knees into a “perfect” position.
Instead, focus on moving with control and keeping the exercise appropriate for your current ability.
Start slowly before adding speed.
Agility Ladder for Beginners
You do not need complicated footwork.
A beginner can start with:
one foot in each square
two feet in each square
lateral stepping
forward-backward stepping
step-in, step-out patterns
Accuracy matters more than speed.
Once the pattern feels natural, you can move a little faster.
Agility Ladder for Older Adults
The ladder can also be useful for older adults when the drills are simplified and performed at an appropriate pace.
It can be used to practice:
stepping accuracy
directional changes
balance
confidence
reaction
The ladder does not need to involve jumping or fast feet.
Slow, deliberate stepping can still be valuable.
Agility Ladder for Athletes
Athletes may use ladder drills as part of a warm-up or coordination session.
They can help practice:
rhythm
foot placement
quick stepping
lateral movement
directional changes
However, ladder drills by themselves do not fully develop sport-specific agility.
True agility also involves reacting to an unpredictable stimulus, accelerating, decelerating and changing direction under real movement demands.
Ladder Drills and Conditioning
Agility ladder drills can raise the heart rate, especially when performed continuously or in intervals.
For example:
20–30 seconds of work
30–60 seconds of recovery
repeat for several rounds
This can provide a short conditioning session.
But ladder work does not replace all other cardio.
Walking, cycling, running, swimming and other forms of aerobic training still have an important place.
Use the Ladder as a Warm-Up
The agility ladder works well in a warm-up because it can gradually increase body temperature while adding coordination.
Try:
forward stepping
lateral stepping
two feet in each square
diagonal stepping
short controlled intervals
Keep the first few rounds easy.
Agility Ladder and Balance
Balance is not only standing on one leg.
It also includes being able to control your body while moving.
Ladder drills can challenge dynamic balance because you are constantly shifting weight from one foot to the other.
An agility ladder can increase energy expenditure like any physical activity, but it does not specifically support fat loss through “hormonal balance” or nervous-system effects.
Body composition is influenced by overall energy balance, activity, nutrition, sleep and many other factors.
Use the ladder because it helps you move, not because it has a special fat-burning effect.
Mental Focus and Confidence
Movement drills that require concentration can be engaging.
Some people enjoy the challenge of learning a pattern and feel more confident as their coordination improves.
That is a meaningful benefit.
I would not claim that ladder drills regulate the nervous system, reduce anxiety or build emotional resilience.
Those are broader claims than the exercise itself can support.
Who Can Use an Agility Ladder?
Many people can use one, including:
beginners
older adults
recreational exercisers
athletes
people returning to exercise
The drill needs to match the person.
If you are recovering from an injury, have significant balance issues or are unsure about fast direction changes, start with slower patterns or get guidance.
Common Mistakes
Common issues include:
trying to go too fast
looking only at the feet
making the steps unnecessarily large
losing posture and balance
turning every drill into a maximal-effort sprint
The ladder is most useful when movement quality stays high.
A Simple Agility Ladder Workout
Try 2–3 rounds of:
one foot in each square
two feet in each square
lateral step-through
in-in-out-out
diagonal step pattern
Work for about 20–30 seconds per drill and rest as needed.
Keep the movements controlled.
How I Use the Agility Ladder at Choose2be
I use the agility ladder as one tool within a broader training program.
It can be combined with:
strength training
balance work
mobility
rotational exercises
conditioning
The goal is not to make the workout flashy.
It is to give the body different movement challenges.
If you want individualized help with footwork, balance, strength and coordination, explore Personal Training in Nanaimo.
Personal Training With the Speediance Gym Monster 1.0 in Nanaimo
A good personal-training space does not need to be a large commercial gym. It needs to be functional, adaptable and equipped well enough to support the person training in it.
In my private Nanaimo training space, one of the main tools I use is the Speediance Gym Monster 1.0. It gives me a compact way to coach strength, cable work and progressive resistance without needing a room full of traditional machines.
Why I Use a Private Training Space
Some people enjoy busy gyms.
Others prefer a quieter environment with fewer distractions.
A private training space can work well for people who want:
one-on-one attention
more privacy
less waiting for equipment
easier exercise modifications
a calmer environment
a session built entirely around their goals
The equipment matters, but the coaching matters more.
What Is the Speediance Gym Monster 1.0?
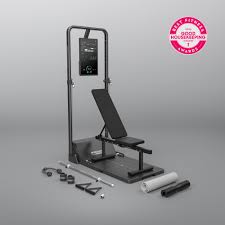
The Gym Monster 1.0 is a digital-resistance strength machine.
Instead of using traditional weight plates or a large cable stack, resistance is controlled electronically.
The machine can be used for exercises such as:
rows
presses
pulldowns
squats
lunges
deadlift variations
cable rotations
arm exercises
lower-body exercises
Its compact setup gives me a lot of exercise options in a relatively small training area.
Digital Resistance
One of the features I like most is how quickly resistance can be changed.
That makes it easy to adjust the load between exercises or between clients without moving plates around.
For example, I can reduce the resistance immediately if someone is learning a new movement or increase it gradually as their strength improves.
That makes progression simple and measurable.
Different Resistance Modes
The Gym Monster includes several resistance settings that change how the load feels during an exercise. Your current article mentions Standard, Chain, Eccentric and Constant modes.
I use these as training options rather than assuming one mode is automatically better than another.
Different modes can be useful depending on the movement, experience level and goal.
Eccentric Training
Eccentric training emphasizes the lowering phase of an exercise.
For example, during a row or squat, the resistance can be increased or controlled differently as you return to the starting position.
This can be useful for strength training, but I would remove the old claim that eccentric training itself “prevents injury.”
It is simply another way to load the muscles.
Progress Tracking
The machine can track training information such as repetitions and resistance used.
That gives us another way to monitor progress over time.
Progress is not only about lifting more weight, though.
We may also track:
range of motion
technique
control
repetitions
endurance
balance
confidence
how an exercise feels
Technology can provide useful data, but it does not replace coaching.
What the Machine Cannot Assess
I would change one section of the old article quite a bit.
The Gym Monster itself does not clinically assess things such as muscle activation patterns, movement dysfunction or injury risk.
Those require observation, appropriate assessment and, when needed, healthcare professionals.
The machine provides resistance and training data.
I provide the coaching.
That distinction makes the article much more credible.
How I Use It During Personal Training
A session depends on the client.
We might use the Gym Monster for several exercises and combine it with dumbbells, kettlebells, bodyweight movements, balance work or mobility.
A typical session could include:
warm-up and mobility
strength work
balance or coordination
accessory exercises
conditioning if appropriate
mobility or cool-down
There is no fixed formula.
The program changes according to the person.
Upper-Body Training
Cable resistance works particularly well for upper-body movements.
Examples include:
seated or standing rows
lat pulldowns
chest presses
shoulder presses
straight-arm pulldowns
triceps work
biceps work
Changing the cable height and body position gives us a lot of options.
Lower-Body Training
The machine can also be used for lower-body strength.
Depending on the client, that might include:
squats
split squats
lunges
deadlift variations
hip-hinge exercises
cable-assisted balance exercises
For some people, the cables can provide support while they learn a movement.
For others, they provide additional resistance.
Core and Rotational Training
Cable-based equipment works particularly well for rotational and anti-rotational exercises.
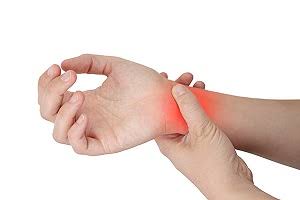
Wrist mobility is easy to overlook until push-ups, yoga, lifting or even everyday tasks start to feel uncomfortable.
The wrists need both movement and strength. They have to tolerate bending, extension, side-to-side motion, gripping and load through the hands.
The goal is not to make the wrists as flexible as possible. It is to build enough range of motion, strength and control for the activities you want to do.
Why Wrist Mobility Matters
Your wrists move through several directions:
flexion
extension
radial deviation
ulnar deviation
forearm pronation and supination
Different activities require different amounts of each.
For example, push-ups and yoga often demand a lot of wrist extension, while lifting and carrying may place more emphasis on grip and stability.
Wrist Pain Is Not Always a Mobility Problem
This is an important distinction.
Pain or stiffness at the wrist can come from many different things, including:
previous injury
repetitive loading
irritation of tendons
nerve compression
joint irritation
reduced strength
limited mobility
too much training volume
Mobility drills can help in some situations, but they are not a universal fix.
If you have persistent pain, numbness, tingling, weakness or symptoms that are getting worse, it is worth getting assessed by an appropriate healthcare professional.
A Simple Wrist Mobility Check
You can explore wrist extension by placing your palms flat on a table or wall.
Keep the fingers relaxed and slowly shift your body forward.
Notice:
whether one side feels different
whether the heel of the hand lifts
whether there is pain
how much range feels comfortable
This is not a diagnostic test.
It is simply a way to become more aware of your current range.
1. Wrist Flexor Stretch
Extend one arm forward with the palm facing up.
Use the opposite hand to gently guide the fingers downward.
You should feel a stretch through the underside of the forearm.
Hold for 20–30 seconds and repeat on the other side.
2. Wrist Extensor Stretch
Extend the arm forward with the palm facing down.
Gently guide the hand downward and toward you.
You should feel the stretch through the top of the forearm.
Avoid forcing the wrist into pain.
3. Prayer Stretch
Bring the palms together in front of the chest.
Slowly lower the hands while keeping the palms together.
This explores wrist extension.
Move only as far as feels comfortable.
4. Tabletop Wrist Rocking
Come onto hands and knees.
Place the palms flat with the fingers pointing forward.
Slowly shift your body forward and backward.
This is a useful way to gradually load wrist extension.
Start with a small range.
5. Finger and Hand Opening
Make a gentle fist.
Then open the hand and spread the fingers.
Repeat slowly for 10–15 repetitions.
This is simple, but it can be useful if your hands feel stiff after typing or gripping.
6. Wrist Circles
Move the wrists slowly through controlled circles.
Try both directions.
The goal is not to make the biggest possible circle.
Focus on smooth movement.
7. Forearm Pronation and Supination
Hold a light hammer, dumbbell or small weight.
Keep the elbow close to the body.
Rotate the forearm slowly so the palm turns up and then down.
This movement trains the forearm muscles that control rotation.
8. Wall Wrist Mobilization
Place the hand against a wall.
Experiment with different finger positions and gently shift your body.
A wall reduces how much body weight is going through the wrist compared with the floor.
That makes it a good starting point.
9. Wrist Strengthening
You can strengthen wrist flexion and extension with a light dumbbell or resistance band.
Support the forearm and move only through the wrist.
Use a light resistance and controlled tempo.
You can also strengthen:
pronation
supination
grip
finger extension
Grip Strength Matters Too
Grip and wrist function are closely connected.
Useful exercises include:
farmer carries
suitcase carries
dead hangs
kettlebell carries
towel grips
light wrist curls
Grip training should be progressive just like any other strength work.
Wrist Mobility for Push-Ups
If push-ups bother your wrists, you do not necessarily have to stop training.
You can modify the position.
Options include:
incline push-ups
push-up handles
dumbbells as handles
fists
reducing range
using a wall
These options reduce the amount of wrist extension required.
Wrist Mobility for Yoga
Yoga can place a lot of repeated load through the hands.
If poses such as Plank, Chaturanga or Downward Dog feel uncomfortable, try:
spreading the fingers
pressing through the full hand
reducing time spent weight-bearing
using blocks or wedges
taking more breaks
modifying onto the forearms
Wrist discomfort is not something you need to push through to “get more flexible.”
Wrist Mobility for Strength Training
Some lifts require more wrist range than others.
Front squats, cleans and certain kettlebell positions can be especially demanding.
Sometimes changing the grip, equipment or variation is more useful than stretching harder.
The right solution depends on the exercise.
Mobility and Strength Should Work Together
Stretching alone may improve how a range feels temporarily.
Strength helps you control that range.
A complete wrist routine can include:
mobility
gradual loading
grip work
forearm strengthening
exercise-specific practice
That combination is usually more useful than only stretching.
What About Carpal Tunnel Syndrome?
Carpal tunnel syndrome involves compression of the median nerve at the wrist.
It can cause:
numbness
tingling
weakness
symptoms in the thumb, index and middle fingers
General wrist mobility exercises are not a treatment for carpal tunnel syndrome.
If you have symptoms like these, especially if they are persistent, get assessed rather than assuming the wrist simply needs to be stretched.
Wrist Mobility Does Not Guarantee Injury Prevention
Mobility and strength can improve capacity.
But they do not eliminate injury risk.
Training volume, recovery, technique, previous injury and overall workload also matter.
A better goal is to build wrists that can gradually tolerate the activities you ask them to do.
Build Gradually
Start with a small amount.
You do not need to perform every drill every day.
A simple routine could include:
10 wrist circles
10 tabletop rocks
10 pronation/supination reps
10 light wrist extensions
20–30 seconds of gentle stretching
Then build from there.
Healthy Wrists Need Variety
Typing, gripping, pushing and lifting all place different demands on the wrist.
Changing positions and using different types of movement can be useful.
If your wrists are constantly irritated, do not just add more exercises.
Look at your total workload.
When to Get Help
Seek professional guidance if you have:
persistent wrist pain
swelling
numbness or tingling
significant weakness
loss of grip
pain after a fall
symptoms that are worsening
Those signs deserve more than a generic mobility routine.
Keep the Goal Practical
The purpose of wrist mobility is not to achieve extreme range.
It is to make everyday movement, yoga and strength training feel more comfortable and controlled.
If you want individualized help with strength, mobility or exercise modifications, explore Personal Training in Nanaimo.
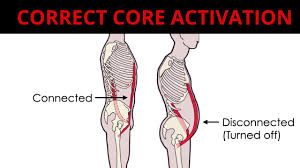
The core is more than the muscles you can see at the front of the abdomen. It includes the muscles around the trunk and pelvis that help create pressure, transfer force and support movement. Your current article already explains that bracing involves the abdominals, obliques, spinal muscles, pelvic floor and diaphragm working together.
The main thing I would change is the idea that your core should be “engaged” all the time. Bracing is useful when the task requires more trunk stiffness, especially during lifting, pushing, pulling or carrying, but you do not need to walk around constantly tightening your abdomen.
What Is Core Bracing?
Core bracing means creating enough tension around the trunk to support the movement you are doing.
It is different from simply pulling your belly button inward.
A good brace usually involves the abdomen expanding and becoming firm in multiple directions rather than flattening inward.
Think about creating pressure around the whole torso, not just tightening the front of the stomach.
The Core Works as a System
The core includes several muscle groups that coordinate together, including:
rectus abdominis
obliques
transverse abdominis
spinal extensors
pelvic floor
diaphragm
The amount of tension you need depends on the task.
A heavy deadlift requires more bracing than walking across the room.
Bracing and Breathing
Bracing does not always mean holding your breath.
For many exercises, you can create tension while still breathing.
During heavier lifts, some experienced lifters may briefly hold their breath to increase intra-abdominal pressure, but that is different from telling everyone never to breathe during exercise.
For most general fitness work, aim for controlled breathing and enough trunk tension to support the movement.
Do Not Suck Your Stomach In
The old cue of “pull your belly button toward your spine” can be confusing.
It tends to encourage hollowing rather than full trunk pressure.
Instead, try this:
Take a comfortable breath.
Let the ribs and abdomen expand.
Then create gentle tension around the trunk as if you were preparing for someone to bump into you.
You should feel firm, but not rigid.
When Bracing Is Useful
Bracing is especially useful during:
deadlifts
squats
presses
rows
carries
push-ups
kettlebell swings
loaded lunges
The goal is to create stability where you need it while still allowing the rest of the body to move.
Squats
Before descending into a squat, create enough trunk tension to keep the torso controlled.
You do not need to force the spine into one perfect position.
Maintain the position that feels strong and appropriate for your body and the load.
Deadlifts
Bracing is especially important during deadlifts because the trunk has to transmit force between the lower and upper body.
Before lifting, create tension around the torso and keep the load close.